Vegan Stracciatella Ice Cream – A Special Request

Ok I admit I haven’t been posting for a while and yes I can see that I have been posting too many desert options on this blog, but had to post this one as the ice cream has been requested by a very special person.  I instantly came up with a vegan version of this very popular ice cream kind (at least here in Germany) as it is actually very simple and ingeniously tasty as most of things from Italian cuisine. The basic recipe is very similar to butterscotch ice cream 


1 cup (235 ml) soymilk – use natural soymilk preferably, with no sugar
2 tbsp arrowroot powder
150 g  sugar
 1 tbsp vanilla extract
2 1/2 (590 ml) soy creamer – for example cuisine from Alpro Soya
100 g of finest dark bitter chocolate (60 % cocoa at least)
 

1. In a small cup combine 1/4 (60 ml ) soymilk and arrowroot powder and set aside

2.  Put soy creamer, remaining soy milk and sugar into a pot and heat it until it starts to boil. Immediately remove from the heat, add the vanilla extract and the arrowroot powder mixture. Have the mixture chilled in the fridge for at least 2-3 hours.

3. Switch on your ice cream maker, pour the ice cream mixture and meanwhile melt chocolate in clean metal bowl set over a saucepan of barely simmering water, stirring frequently, then transfer to a 1-cup glass measure. When ice cream has finished churning, carefully pour chocolate in a slow stream directly onto ice cream as it churns and continue to churn 30 seconds (chocolate will harden in steaks). Transfer ice cream to an airtight container and put in freezer until firm, at least 4 hours.

A Very Healthy Chocolate Mousse

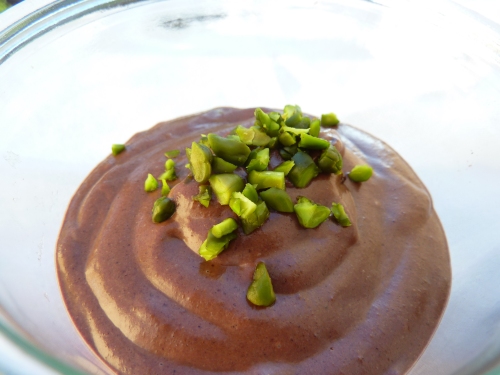
Some chocolate mousse can be very heavy as they normally consist of chocolate, egg, cream, butter  – all the stuff you don’t want to be seeing back on your hips or as love handles around your tummy. This one is sort of magic mousse as it has only healthy ingredients and no butter, egg nor cream there it is even more satisfying. Key here is to use very ripe bananas and try to experiment as well – use peanut butter instead of hazelnut butter or as well almond butter. The inspiration for the recipe came from an amazing food blog, GreenKitchenStories – http://www.greenkitchenstories.com.

You probably wonder where to get hazelnut butter – it is not a magic but you can make it yourself, see recipe below – and it is dead simple to make!

For 4 small glasses or 2 large ones
2 bananas
4-5 tbsp cacao powder (unsweetened)
4 tbsp hazelnut butter
a pinch vanilla extract or from fresh vanilla pod (optional)
1-2 tbsp soya milk  ( optional – however to make the mousse smoother, definitely advisable)
 

Place all the ingredients into blender and process until it makes a smooth mass. Transfer the mixture into glasses, sprinkle with pistachios/coconut flakes or whatever you like! Place the mousse into fridge before serving

Hazelnut butter: 
2 cups of roasted hazelnuts
1 tsp hazelnut oil
1/2 tsp salt
1 tbsp sugar
 

Process all ingredients in the food processor until the mixture becomes buttery (as you would know it from peanut butter) and slightly crunchy. Add some sugar /salt if required. The butter can be stored in a jar in the fridge for a month and can be enjoyed as a spread on breads and etc..

Raw Chocolate Hazelnut Truffles


12 dates (without seeds)
100 g coconut flakes
100 g  hazelnuts
1 tbsp coconut oil
4 tbsp cocoa powder
1 tbsp water
1 tsp cinnamon
some ground hazelnuts, coconut flakes for coating
 

1. Place all the ingredients into food processor and grind until hazelnuts and dates are ground. The mixture will look crumbly.

2. Mold the mixture into round balls and coat them with cocoa powder, hazelnuts or coconut flakes. Place the truffles into the fridge before serving


Al Fresco Dining Experience: Baba Ghanoush

Although the weather hasn’t been exactly welcoming for an al fresco dining experience, this recipe is perfect for enjoying picnics and dinners outside.  And if it rains, just enjoy this dip indoors, that would work as well 😉 The dip is perfect to go with salads, meat, breads

2 aubergines
2 garlic cloves
juice from one lemon
4 tbps. tahini
a bit of olive oil
1/4 tsp ground cumin
 

1. Roast the aubergines in an oven for half an hour. Let them rest and cool down for a bit. Scoop out the aubergine flesh and remove any juices.

2. Now place all the ingredients into the food processor and process until the mixture has a smooth texture. Sprinkle with crush pink pepper, sesame seeds and/or chopped parsley before serving

Saturday Brunch Delights – Vegan Cinnamon Buns & Chocolate Pancakes

Weekends should be definitely more about spending the time with people you love and food you love.  So this rainy Saturday was  perfect for such occasion: a  lazy brunch with my friends incl. a good chat, laugh and  loads of yummy food. I baked a vegan version of cinnamon buns which immediately became very popular with everyone at the table and also some vegan chocolate pancakes.  I tried to use a lot spelt flour and buckwheat flour in those recipes, as those flours tend to be more healthy in terms of minerals contents but that doesn’t mean that you can’t use normal wheat flour for it.

Vegan Cinnamon Buns

For the dough:
2 packs of active dry yeast (7 g a pack)
1 cup (235 ml) warm water
1/2 cup and a tablespoon of sugar
2 cups of all purpose flour and 1 cup of spelt flour (375 g alltogether)
1 teaspoon of pure vanilla extract
1/4 teaspoon of sunflower oil
1/4 tsp cinnamon
2 tbsp of melted non dairy butter
 
For the cinnamon filling :
2 cups (44o g) brown sugar
1 tsp ground cinnamon
112 g of non dairy butter (softened)
 

1. Dissolve the yeast in the warm water and 1 tbsp of sugar. Let it sit bubbly for 5 minutes

2. Mix flour, cinnamon, sugar, vanilla, the melted butter and then add the yeast mixture. Begin to knead by using hands or your kitchen mashine til the dough gets elastic. Add more flour if it is too sticky or add more water if it is to dry.

3. Form into a ball and place it on an oiled plate. Cover with a cling film and a towel and let it rise for an hour.

4. Meanwhile make the filling: mash the brown sugar together with the  butter and cinnamon. Set aside.

5. Have ready a glass baking dish (23×30,5 cm). Punch down the dough. On flat, floured surface press out the dough into a rectangle about 23x 30 cm.

6. Spread evenly the cinnamon filling on it, leaving about 1,5 cm border on shorter sides. Now starting at the short edge, roll the dough and seal it at the end. Using a sharp knife, cut the roll into 12 pieces. Place them tightly into the glass dish and let them rest for another 45 minutes

7. Bake for 15-20 minutes or until gold brown. Let them rest for 5 minutes to soak up the juices. Serve upside down so all the juices on top.

Chocolate Pancakes

1 cup of all purpose flour and 1 cup of buckwheat flour
1/2 cup (27 g) unsweetened cocoa powder
1 tsp baking powder
1 tsp baking soda
a pinch of salt
1 1/2 to 2 cups of soy milk or any other non dairy milk (I used rice milk)
1/2 cup canola oil or rapeseed oil
1/2 cup (112 g) sugar
optional: 1/2 cup of chocolate chips

1. In a mixing bowl mix together first the dry ingredients (apart from chocolate chips and sugar) and in a separate bowl milk, oil and sugar.

2. Mix then the wet with dry ingredients and stir until there are virtually no lumps. Fold in then the chocolate chips ( I didnt use them as it would have been too sweet for me, but you can go wild here :))

3.  Preheat the frying on high heat. Drop the batter and spread it evenly by turning the pan. Fry it until the uncooked side becames bubbly and the edges begin to lift. Flip and cook for an additional minute

A Bee Pollen Smoothie

Spring/Summer is in the air ! Perfect time to enjoy cooler drinks like smoothies.  For this drink I took an inspiration from Sarah B. s blog once again (http://mynewroots.blogspot.com/2011/05/whats-all-buzz-about-bee-pollen.html ) and used bee pollen. Why bee pollen? Well Sarah explains it much better in her blog, so why don’t you read all there and enjoy the pictures here 🙂 But to summarise bee pollen is ultrahealthy and is a great allergy relief apparently. Following Sarah’s advice, I made my own bee pollen smoothie. The bee pollen that I got was from my dear colleague/friend’s own honey online shop – http://imkerei-dettlaff.de/shop . His mum produces  honey and all the honey  products herself in beautiful Bavaria. The quality of the honey is really great and is definitely worth trying ( I haven’t stopped ordering the products there since I tried their honey for the first time!)

 
a cup of rice milk
a cup of fresh raspberries
one frozen banana
one pitted date
2 cm of peeled, chopped ginger root
1 tsp of bee pollen
 

Place everything in a blender and enjoy it once done! Sooooo simple….

Aubergine Lemon Soup & Very Organic Focaccia

The idea of making my very own focaccia and mixing the yeast with water for it reminded me a lot of my home and my grandma, who used to be incredibly good at baking. She used to set the dough though to rise overnight, in the case of the focaccia here I set the dough rise for an hour, but the result was still amazing! As with all focaccia you can do various toppings, in this case I used some red onions, garlic and pecorino cheese.  Why I used spelt flour (Dinkel in German) in here? It is just way lighter than the normal wheat flour and has more fibre, as well as protein and magnesium. You could also use a mixture of buckwheat, potato flour and/or corn flour instead or of course normal flour.

The soup is just a suggestion, obviously you can enjoy focaccia without it or with any other soup/salad and whatever you fancy!

Focaccia:

25 g fresh yeast 
1/2 tsp maple syrup or agave nectar
250 ml lukewarm water
500 g wholemeal spelt flour
2 tsp sea salt 
10 tbsp olive oil
a bit of pecorino
2 tsp of fleur de sal or any other high quality sea salt
 1 small red onion cut into halves
a clove of garlic, cut into small pieces
 

1. Mix the yeast, water and maple syrup together until the yeast dissolves completely.

2. Put flour, 6 tbsp of olive oil and  the yeast mixture into a large mixing bowl (or the bowl of your KitchenAid) and knead the dough really well until it becomes one piece of a dough. Cover it with a towel and place in a warm place for an hour. (P.S: placing a flower next to it isn’t unnecessary, it was only just make the picture more pretty :))

3. After an hour, the dough should have risen by half of its original size. Now spread some flour on a surface and make an oval from the dough for the focaccia of a size you like. Cut some stripes (5 mm deep) into the dough and let focaccia to rest for another half an hour covered by a kitchen towel.  Meanwhile set the oven to 220 C

4. Now decorate your focaccia with the toppings you like, in my case it was red onions, pecorino , garlic and  fleur de sal. Spread 4 tbsp of remaining olive oil on top and place into the oven for 20 minutes

Grilled Aubergine Soup

3 large aubergines
1 litre vegetable stock
2 tbsp fresh lemon juice
70 ml soy creamer (or  dairy cream)
10 basil leaves
 

1. First you need to grill the aubergines t to impart the smoky flavor necessary for this soup.  Place them into the oven for half an hour or so and set the oven to the highest setting or even a grill…Dont worry if the aubergine start to burst (just dont have a popcorn action in there as it will get too messy otherwise!).

2. When the aubergine has cooled down a bit, make an incision along each one and spoon out the cooked flesh, avoiding any black bits of skin. Chop the flesh roughly with a large knife and place in a saucepan with the stock, lemon juice and roughly 1 1/2 teaspoons of salt and 1 teaspoon of the pepper. Bring to the boil then reduce the heat and simmer for 3o minutes.  Taste the soup and adjust the seasoning if needed.

3. To serve, mix the cream into the hot soup and ladle into warm bowls. tear the basil leaves and scatter them on top.

Raw Brownie – A New Cooking Adventure

Ok I have to admit  I wasn‘t really familiar with raw cooking until Carla A. introduced me to it. Carla A. is an amazing raw food blogger  and a very good friend of mine (see http://beeskneeskitchen.wordpress.com/ for more raw food inspirations).  It took me also a while to try it out myself and here it comes:  a raw brownie, my first take at raw cuisine. Also another confession that I have to make here: The second inspiration for this recipe came from one of my favourite bloggers, Sarah B. (see http://mynewroots.blogspot.com/), a Danish nutrionist, whose recipes are not also nutritious but also unbelievably tasty and packed with lots of useful information about the ingredients. And guess what – who introduced me to this blog? Carla… Carla, you are the best, this post is dedicated to you!

P.S: this brownie is absolutely guilt free as there is no sugar, no flour , no eggs and no fat involved!

Ingredients:
2 cups whole walnuts (200 g)
2 ½ cups dates (around 250 g), pitted
1 cup raw cacao
1 cup hazelnuts or almons, roughly chopped
¼ tsp. sea salt ( optional)
 
 1. Place walnuts in food processor and blend on high until the nuts are finely ground.
 

2.  Add the cacao and salt. ( Sarah has salt in her recipe, I didnt use and it was fine)  Pulse to combine.

3. Add the dates one at a time through the feed tube of the food processor while it is running. You should end up with a mixture that is quite crumbly and can be easily mixed together and that also sticks together. If it isnt sticky enough, just add more dates

4. In a large bowl combine the walnut-cacao mix with the chopped almonds or hazelnuts. Press into a lined cake form or some type of mold.

5. Place into the freezer for an hour. Once it is cold, it is easier to cut the brownie before serving. Once cut, store the brownies in an airtight container, preferably in fridge.

Crostata di Fichi – an Ode to Lago Como

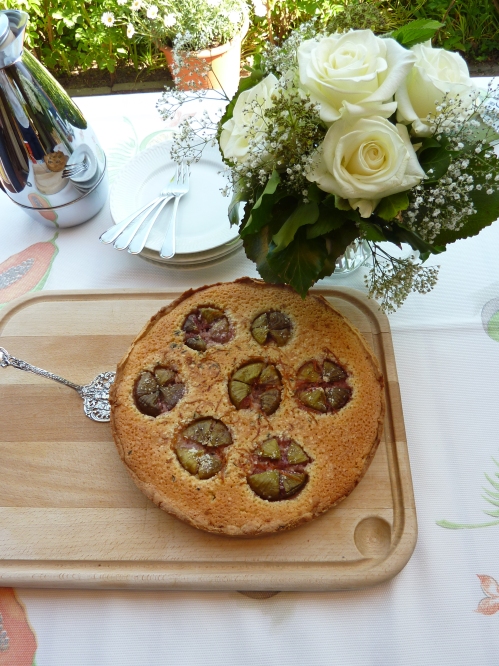
Actually I decided to do a different post this time…. a post without a recipe. I enjoyed making this cake so much as it reminded me a lot of the recent holiday at Lago Como.  Italian food is simple but at the same time beautiful and for any semi prof or prof cook Italy is probably one of the most fullfilling countries to be in when it comes to coming. This cake is full of almonds, sugar and figs and lots of care (obviously). It was enjoyed on a sunny day as you can see so therefore a perfect occasion for a perfect cake. If you still want to have the recipe for it, go on and ask me! But be ware this cake may make you very popular among the ones that taste it.

UPDATE ( a day later :))

Serves 8

15 whole figs, washed
2 tablespoons sugar
2 tablespoons water
2 sprigs of fresh thyme, leaves picked
zest of 1 orange

for the shortcrust pastry:
9 tablespoons butter
1 cup icing sugar
a small pinch of salt
2 cups all-purpose flour
optional: 1 vanilla pod, scored lengthways and seeds removed
zest of a lemon
2 large egg yolks, preferably organic
2 tablespoons cold milk or water

for the frangipane:
10oz blanched whole almonds
6 tablespoons all-purpose flour
1 cup, plus 2 tablespoons unsalted butter
14 tablespoons sugar
2 large eggs, preferably organic, lightly beaten
1 vanilla pod, scored lengthways and seeds removed
1 tablespoon grappa

1. First you will need to grease a loose-bottomed 28cm/11 inch tart tin with a little of your butter.

2. To make your pastry, cream together the butter, icing sugar and salt and rub in the flour, vanilla seeds, lemon zest and egg yolks – you can do all this by hand or in a food processor. When the mixture looks like coarse breadcrumbs, add the cold milk or water. Pat and gently work the mixture together until you have a ball of dough, then flour it lightly. Don’t work the pastry too much, otherwise it will become elastic and chewy, not flaky and short as you want it to be. Wrap the dough in clingfilm and place in the fridge for at least an hour. Remove it from the fridge, roll it out and line your tart tin. Place in the freezer for an hour.

3. Preheat the oven to 180°C  and bake the pastry case for around 12 minutes or until lightly golden. Remove from the oven and turn the heat down to 170°C

4. To make the frangipane, blitz 9oz of the whole almonds in a food processor until you have a fine powder and transfer this to a bowl with the flour. Now blitz the butter and sugar until light and creamy. Add this to the almonds with the lightly beaten eggs, the vanilla seeds and the grappa and fold in until completely mixed and smooth. Place in the fridge for at least half an hour to firm up.

5. Remove the stems from the figs, score each one on the top in the shape of a cross, then using your thumb push up from the base to open them out.

6. Spoon the chilled frangipane mixture into the pastry case, then lightly push the figs into the frangipane with the scored side up. Heat the sugar with the water and drizzle this syrup over the figs. Roughly chop the remaining almonds and sprinkle over the top with the thyme leaves and orange zest. Bake in the preheated oven for about 40 minutes, or until the frangipane mixture has become firm and golden on the outside but is still soft in the middle. Allow to cool for about 30 to 40 minutes.

Recipe  Source: Jamie Oliver

Three Potato Salad with Mustard Salmon

Actually I am not sure if this recipe is really worth posting as it is very simple. But I just love the colours of it and therefore had to post it. Also it is a perfect mid week meal which is just so easy to make. If you can’t find blue potatoes, just use sweet potatoes instead but the colours won’t be as great as from the combination below.

Serves 2:
1 medium sweet potato
2 medium blue or purple potatoes
2 medium yellow potatoes
1 celery stalks, thinly sliced on the diagonal
1/3 cup pitted kalamata olives or sun-dried tomatoes, sliced
1 tablespoons extra-virgin olive oil, or more, as desired
1 to 2 tablespoons apple cider vinegar
2 to 3 tablespoons minced fresh dill
Salt and freshly ground pepper to taste
3 big handfuls rocket or baby spinach leaves,
Toasted pumpkin seeds  or sunflower seeds for topping, as desired
 

1.  Just cook or bake the potatoes as you like. Once cooked, cool down the potatoes before cutting them into pieces

2. Cut the rest of ingredients as desired and mix them with potatoes and olive oil/vinegar

Salmon:
2  salmon filets about 140g 
2 tsp wholegrain mustard
some fresh dill (optional)
squeezed lemon juice from one lemon

1. Mix the mustard, dill  and lemon juice together and brush the salmon filets with it, leave some of the mixture on side

2. Put the filets under a grill in the oven for 6-7 minutes depending on the thickness of salmon filets

3. Serve salmon with some lemon juice mustard mixture on side (optional)